If you’ve been doing traditional sit-ups for years, there’s a good chance you’ve developed some less-than-ideal habits.
Maybe you’re using momentum to swing yourself up. Perhaps you’re pulling on your neck with your hands. Or you might be relying more on your hip flexors than your abs to complete each rep.
Enter the zombie sit up… a variation that eliminates these common compensations by forcing you to keep your arms extended straight out in front of you throughout the movement.
The name comes from the arm position, which resembles the classic “zombie walk”. But don’t let the playful name fool you – this variation is significantly more challenging than standard sit-ups and delivers superior core engagement.
This exercise guide covers everything you need to know about zombie sit-ups, including proper form, benefits, progressions, and how to integrate them into your training.

Quick Summary
- Zombie sit-ups are performed with your arms extended straight out in front of you, parallel to the ground.
- The arm position prevents momentum and neck strain while increasing core engagement.
- They primarily work the rectus abdominis while also engaging the hip flexors and obliques.
- Start with bodyweight before progressing to weighted variations.
How to Perform a Zombie Sit Up
To do zombie sit-ups:
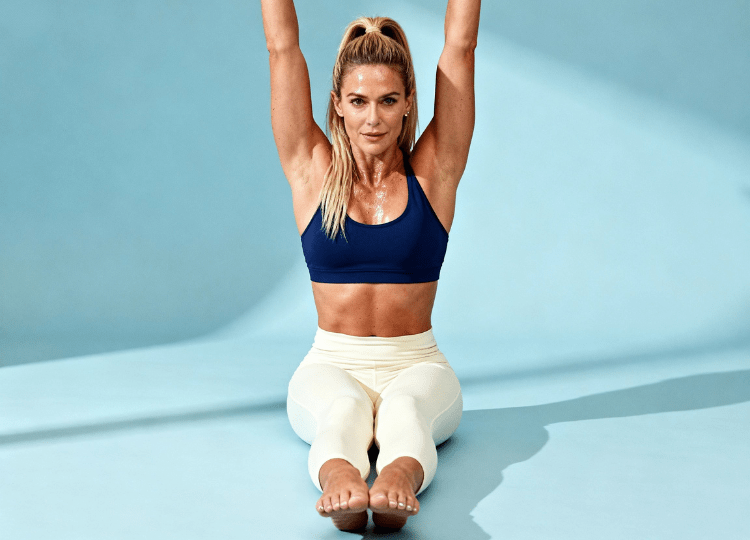
- Lie flat on your back with your legs extended straight out in front of you.
- Keep your legs together or hip-width apart, whichever feels more stable.
- Extend your arms straight up toward the ceiling.
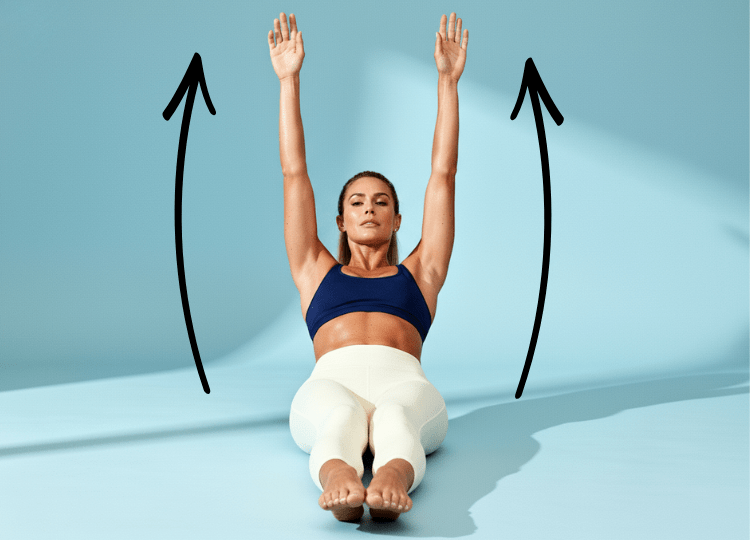
- Engage your core and begin rolling your shoulders off the ground.
- Continue curling up, peeling your spine off the floor one vertebra at a time.
- Use only your abdominal muscles to lift yourself – don’t rock or use momentum.
- Rise until your torso is upright.
- Pause briefly at the top, and then slowly lower yourself back down with control, reversing the movement.
Coach’s Tip
Think about “peeling” your spine off the ground rather than just hinging at the hips. This sequential movement pattern maximizes core engagement and reduces hip flexor dominance.
Tempo Recommendations
A controlled tempo maximizes the effectiveness of zombie sit-ups:
- 2-3 seconds to curl up
- 1 second pause at the top
- 2-3 seconds to lower down
- Minimal rest at the bottom before starting the next rep
Avoid fast, bouncing reps. If you can’t maintain this tempo, you need to build more strength before adding reps or weight.
Anchor Your Legs or Not?
You can perform zombie sit-ups with free legs (not anchored) or with someone holding your feet down or tucking them under a couch. Both approaches have merit.
Free Legs – This is significantly more challenging because your legs may want to lift off the ground as you sit up, especially if your core isn’t strong enough yet. This tests pure core strength without assistance.
Anchored Legs – Having your feet held down or secured makes the exercise more manageable. This allows you to complete more reps and build the necessary strength to eventually progress to free legs. However, anchored feet can allow more hip flexor involvement.
Most people should start with anchored feet to learn the movement pattern, then progress to free feet as core strength improves. The free-leg version demands greater core control and reduces hip flexor dominance.

Muscles Worked
Zombie sit-ups engage multiple muscle groups, though the emphasis differs from other ab exercises.
Rectus Abdominis
This is the primary mover during zombie sit-ups. The rectus abdominis, commonly known as the “six-pack muscle,” runs vertically along the front of your abdomen.
It’s responsible for spinal flexion – the curling movement that brings your ribcage toward your pelvis. The sequential rolling pattern of zombie sit-ups works this muscle through its full range of motion.
The extended arm position increases the challenge to your rectus abdominis because you’re lifting more of your upper body mass without the mechanical advantage that bent arms provide.
Hip Flexors
With straight legs, the hip flexors are minimally involved compared to bent-knee sit-up variations. This is actually one of the key benefits of the zombie sit-up with straight legs – it forces your core to do the majority of the work.
However, the hip flexors still contribute to the movement, particularly in the final portion where you reach upright position. They work primarily as stabilizers rather than prime movers when your legs are straight.
If you feel the exercise almost entirely in your hip flexors rather than your abs, you’re likely using momentum or rocking to generate movement. Slow down and focus on pure core contraction.
Obliques (Internal and External)
The obliques work to stabilize your torso and prevent rotation during the movement. While they’re not the primary movers, they’re constantly engaged throughout the exercise.
You can increase oblique involvement by adding a slight twist at the top of the movement, reaching your hands toward opposite sides.
Transverse Abdominis
This deep core muscle acts as a stabilizer throughout the movement, creating intra-abdominal pressure that supports your spine. It works harder when you properly brace your core before beginning each rep.
Lower Back (Erector Spinae)
The muscles along your spine work eccentrically (lengthening under tension) as you curl up and concentrically as you lower down. They help control the movement and maintain spinal alignment.
Serratus Anterior
These muscles, located along the sides of your ribcage, work to keep your shoulder blades stable as you maintain the extended arm position throughout the movement.

Weighted Zombie Sit-Up Progression
Once you can perform 15-20 bodyweight zombie sit-ups with perfect form, you’re ready to consider adding weight. This progression increases the challenge and continues building core strength beyond what bodyweight alone can provide.
Why Progress to Weighted Variations
Bodyweight zombie sit-ups build muscular endurance and foundational core strength. However, like any exercise, your body adapts to the stimulus over time.
Adding weight creates progressive overload – the principle of gradually increasing training demand to continue making gains. This is how you build stronger, more defined abs beyond the initial adaptation phase.
Weighted variations also make the exercise more time-efficient. Instead of doing 30+ reps, you can perform 8-12 challenging reps with added resistance and achieve similar or better results in less time.
Weight Options
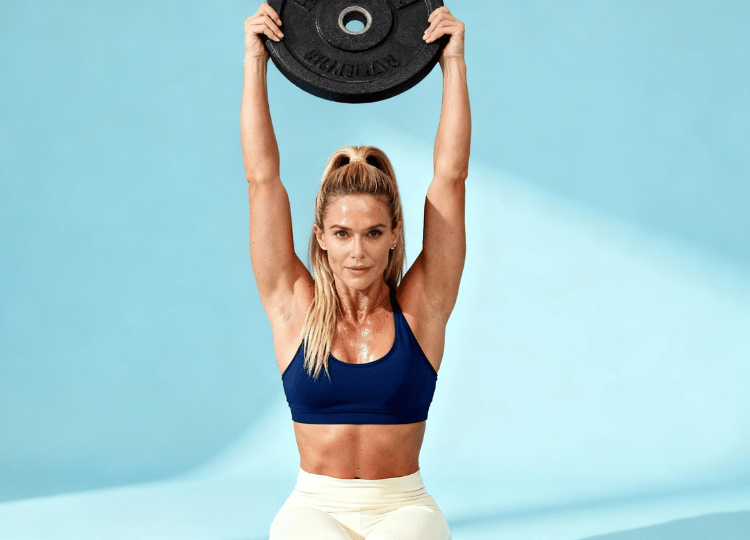
- Dumbbell or Weight Plate Held at Chest – Hold a dumbbell or weight plate against your chest with both hands. This is the simplest weighted variation because the weight stays close to your center of mass.
- Medicine Ball Extended Forward – Hold a medicine ball in zombie arm position (extended straight out). This is significantly more challenging than holding weight at your chest because the weight is farther from your center of mass.
- Dumbbell Extended in Zombie Position – Hold a light dumbbell in both hands while maintaining zombie arm position. This is one of the most challenging variations because you’re combining extended arm position with added resistance.
- Weight Vest – A weight vest distributes load evenly across your torso, which some people find more comfortable than holding a weight. This allows you to maintain pure zombie arm position while adding resistance.
Progression Strategy
Follow this systematic approach to weighted zombie sit-ups:
Stage 1: Master Bodyweight – Perform 3 sets of 15-20 reps with perfect form before adding weight.
Stage 2: Light Weight at Chest – Add 5-10 pounds held at your chest. Build up to 12-15 reps for 3 sets.
Stage 3: Moderate Weight at Chest – Increase to 15-25 pounds at chest. Work toward 10-12 reps for 3 sets.
Stage 4: Light Weight Extended – Hold 4-6 pounds in zombie position. Even this light weight will be challenging. Build to 8-10 reps for 3 sets.
Stage 5: Moderate Weight Extended – Progress to 8-12 pounds in zombie position as you get stronger.
Don’t rush through these stages. Spend 2-4 weeks at each level before progressing. Adding weight too quickly compromises form and increases injury risk.
Coach’s Tip
Your rep count will drop significantly when you first add weight or move the weight farther from your center of mass. This is normal and expected. If you can’t perform at least 6 clean reps with the added weight, it’s too heavy.
Sample Weighted Progression
Here’s what 8 weeks of progression might look like:
Weeks 1-2: Bodyweight – 3 sets of 15 reps Weeks 3-4: 10lb plate at chest – 3 sets of 12 reps
Weeks 5-6: 15lb plate at chest – 3 sets of 10 reps Weeks 7-8: 6lb medicine ball extended – 3 sets of 8 reps
This gradual approach builds strength systematically while maintaining proper form.
Alternatives to Adding Weight
If you don’t have access to weights or want to progress differently, consider these alternatives:
- Increase Tempo Challenge – Slow down your reps even more. Try 4 seconds up, 2 second pause, 4 seconds down. This increases time under tension without adding external load.
- Pause Variations – Add 2-3 second pauses at different points in the range of motion (quarter-way up, halfway up, three-quarters up). This creates additional challenge at specific positions.
- Decrease Rest Periods – Reduce rest between sets from 60 seconds to 30 seconds. This increases the metabolic demand and challenges muscular endurance differently than adding weight.
- Increase Total Volume – Add more sets rather than more weight. If you’re doing 3 sets of 15, progress to 4 or 5 sets before adding load.
Things to Consider
Neck Issues
While zombie sit-ups are better than traditional sit-ups for neck health (because your hands aren’t behind your head), people with existing neck problems should still use caution.
If you experience neck pain, try placing your tongue on the roof of your mouth throughout the movement. This activates deep neck flexors and can reduce strain. If pain persists, consider alternative core exercises.
Lower Back Problems
Sit-ups in general create spinal flexion under load, which can aggravate certain lower back conditions. If you have a history of disc issues or lower back pain, consult a healthcare professional before incorporating zombie sit-ups.
Exercises like dead bugs, planks, and pallof presses might be better options for building core strength without spinal flexion.
Pregnancy
After the first trimester, exercises performed flat on your back aren’t recommended due to potential pressure on the vena cava. Pregnant individuals should focus on standing or side-lying core exercises instead.
Hip Flexor Tightness
If you have very tight hip flexors, zombie sit-ups might feel uncomfortable or cause cramping. Address hip flexor flexibility with stretches like the couch stretch before emphasizing sit-up variations.
Integration Strategies
As Part of Core Circuits – Include zombie sit-ups in dedicated core training alongside other ab exercises:
- Zombie sit-ups: 12 reps
- Plank: 30 seconds
- Russian twists: 20 total
- Dead bug: 10 per side
- Repeat 3-4 rounds
As a Finisher – Perform 2-3 sets of maximum reps at the end of your workout. This creates additional training volume without interfering with your main lifts.
In Supersets – Pair zombie sit-ups with exercises that don’t fatigue the core:
- Dumbbell rows + zombie sit-ups
- Bicep curls + zombie sit-ups
- Face pulls + zombie sit-ups
This allows efficient use of rest periods while targeting different muscle groups.
Standalone Ab Sessions – Dedicate 10-15 minutes to focused core work 2-3 times per week. Zombie sit-ups can be the primary exercise in these short sessions.
Bottom Line
Zombie sit-ups offer a superior alternative to traditional sit-ups by eliminating common compensations and forcing your core to do the work without assistance from momentum or neck pulling.
Start by mastering the bodyweight version with perfect form – aim for 3 sets of 15-20 reps before considering weighted progressions. Focus on the sequential rolling motion, keeping your arms locked in zombie position throughout the entire movement.
When you’re ready to progress, add weight gradually. Begin with light loads held at your chest, then advance to holding weight in extended position only after building sufficient strength. Even 5-10 pounds in extended position will feel challenging.
Related Articles:
Fire Hydrant Exercise – Benefits and Muscles Worked
Dumbbell Power Cleans Exercise Guide
7 Hip Adductor Stretches To Unlock Newfound Lower Body Mobility