Walk into any gym and you will see cable glute kickbacks being done, usually with too much weight, too much momentum, and far too little glute involvement. It is one of those exercises that looks straightforward, gets performed badly almost universally, and is written off by serious lifters as a result.
That is a shame. Because when cable glute kickbacks are done correctly, with an understanding of the biomechanics behind why the set-up matters so much, they earn their place in any lower body programme as one of the most targeted glute isolation exercises available.
This guide explains the exercise properly: what the cable actually changes compared to other kickback variations, how knee angle determines whether you are training your glutes or your hamstrings, and why the hinge position at the start is not optional.

Quick Summary
- Unlike bands or bodyweight versions, the cable keeps the glute under load through the entire movement, both stretched and contracted. That makes it a more complete and controllable stimulus for growth.
- A bent knee shifts the work onto the glutes, while a straighter leg lets the hamstrings take over. Combine that with a proper hip hinge and controlled reps, and the exercise becomes a true glute isolation movement.
- Cable kickbacks shouldn’t replace heavy compounds like hip thrusts or RDLs. Their value is in adding targeted glute volume, improving mind-muscle connection, and fixing imbalances after the main work is done.
What Makes the Cable Version Different
Most people treat cable kickbacks as interchangeable with resistance band or bodyweight donkey kick variations. They are not.
The key distinction is the resistance curve. With ankle weights or bodyweight, resistance is highest at the top of the movement when the leg is raised, and falls off significantly as the leg returns to the start position. The glute is barely loaded in the early range of the movement at all.
A cable machine delivers constant tension throughout the entire arc of the movement. From the moment you begin extending the hip to the peak contraction at the top, the cable is pulling against you consistently. This matters because it means the glute is working under load in both its lengthened and shortened positions, which is a more complete stimulus than variable-resistance alternatives can provide.
It also means progressive overload is straightforward: you add a plate. With bands and bodyweight, the options are limited and the resistance is often imprecise.
Muscles Worked
Gluteus maximus
Gluteus maximus is the primary target and the reason most people do this exercise. It is the largest muscle in the human body and the principal driver of hip extension. The cable kickback loads it directly through a full range of that extension movement.
One nuance worth understanding
Research published in the Journal of Orthopaedic and Sports Physical Therapy found that the gluteus maximus has functionally distinct superior and inferior portions, with the superior portion showing preferential activation during exercises that incorporate elements of hip abduction or external rotation alongside extension. Kicking the leg back in a very slightly diagonal, outward direction rather than perfectly straight back can therefore produce a more complete activation of the whole muscle. Not a dramatic angle, just a subtle outward path.
Gluteus medius and minimus
Gluteus medius and minimus contribute to pelvic stability throughout the movement. The standing leg’s gluteus medius in particular is working continuously to prevent the pelvis from dropping during the single-leg phase of each rep.
Hamstrings
Hamstrings assist with hip extension, but how much they assist depends directly on how you set up your knee. More on that in a moment.
Core
Core works isometrically throughout to maintain the hinged torso position and prevent the lower back from compensating. If you feel this exercise primarily in your lower back, the core has disengaged and the lumbar spine is doing work it should not be doing.
How to Perform Cable Glute Kickbacks
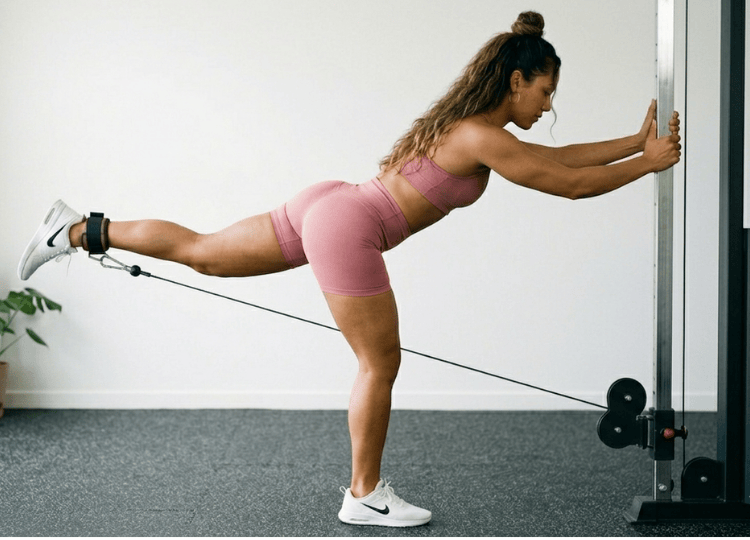
- Set the cable pulley to the lowest position and attach an ankle cuff to your right ankle.
- Stand facing the machine. Step back slightly so there is some tension in the cable before you begin, then hinge forward at the hips to approximately 45 degrees, bracing your core and keeping your spine neutral. Hold the cable frame with both hands for stability.
- The hinge is not optional. Standing upright for this exercise limits the available range of hip extension and reduces the load on the glute at the top of the movement. The forward lean creates the mechanical conditions for the hip to extend fully and the glute to contract hard at the peak.
- From the hinged position, keep a slight bend in the right knee, brace the core, and drive the right leg back and up by extending the hip. The movement comes from the hip, not the knee. The thigh and calf position relative to each other should barely change throughout the rep: you are not performing a hamstring curl, you are hinging the femur at the hip joint.
- Drive back until you feel a strong contraction in the glute, then pause for 1 second. Do not kick beyond the point where you feel lumbar extension taking over. The lower back arching is the sign that hip extension has ended and compensation has begun.
- Lower the leg slowly with control over 2 to 3 seconds back to the start. Do not let the cable yank the leg forward. The return is eccentric work and counts.
Sets and reps: 3 to 4 sets of 12 to 15 reps per side.
The Knee Angle Question: Glutes vs Hamstrings
This is the most important technical detail in the exercise and the 1 thing that most guides get wrong or leave vague.
The hamstrings cross 2 joints: the hip and the knee. When the leg is kept nearly straight during a kickback, the hamstrings are in a favourable position to assist with hip extension, and the central nervous system will let them do exactly that, diverting work away from the gluteus maximus in the process.
When the knee is held at a bent angle, somewhere between a slight bend and roughly 90 degrees, the hamstrings are placed in a mechanically shortened position at the knee joint. This makes them less able to contribute to hip extension, which shifts the demand onto the gluteus maximus directly.
This is the same principle that makes the hip thrust and glute bridge more effective at isolating the glute than the stiff-leg deadlift. The bent knee loads the glute by disadvantaging its main synergist.
For cable glute kickbacks: keep a meaningful bend in the working knee throughout the entire rep. The leg should not be straight, and the bend should remain consistent rather than flexing more at the top as a compensation. If you find the weight is causing you to bend the knee further on the way up, the weight is too heavy.
Benefits
True glute isolation
Compound movements like squats, deadlifts and hip thrusts train the glutes, but they also heavily recruit the quads, hamstrings and adductors. The cable kickback, when performed correctly, directs the majority of the load to the gluteus maximus specifically. This is valuable for bringing up a weak glute or for adding targeted isolation volume on top of compound work.
Constant tension through the full range
Unlike gravity-dependent exercises where the glute unloads at certain joint angles, the cable provides resistance throughout the entire arc of the movement. This increases the quality of time under tension and provides a stimulus that free weight variations of the same movement cannot fully replicate.
Unilateral training and imbalance correction
Working 1 leg at a time reveals strength differences between sides that bilateral exercises mask. Most people have a dominant glute, and programming this exercise per side makes that visible and addressable.
Minimal joint stress
Performed correctly, the cable kickback places very little load on the knee or lower back compared to heavy compound movements. This makes it a useful option on days when lower back fatigue from deadlifts or squats is a limiting factor, or for those managing certain lower body injuries.
Progressive overload is precise
Adding 2.5kg to the cable stack is simple, controlled and repeatable. This makes tracking strength progress on the exercise genuinely useful, unlike band-based versions where progressive overload is approximate at best.
Variations
- Quadruped cable kickback. Set the cable low, attach the ankle cuff, and get on all fours with your hands and supporting knee on the floor or a mat. Drive the working leg back and up, keeping the knee bent. This removes the balance demand entirely, which can be useful early on when learning the movement pattern, and allows slightly greater range of motion at the hip.
- Straight-back kickback for glute medius. Kick the leg at a 45-degree diagonal outward rather than directly back. This recruits more of the superior gluteus maximus and gluteus medius. Worth including if upper glute development is a specific goal.
- Elevated standing leg. Place the supporting foot on a small step or weight plate. This increases the available range of hip extension on the working side by preventing the foot from touching the ground at the bottom of the arc, allowing the glute to work through a longer movement.
- Paused reps. Hold the peak contraction for 2 to 3 seconds before lowering. This eliminates any momentum and ensures the glute is doing the work rather than the leg being swung into position.
Common Mistakes
Using momentum
The leg should move through the rep as a controlled arc. If the leg is swinging, the momentum is doing the work and the glute is not. Drop the weight.
Arching the lower back at the top
This is the single most common error and the reason many people feel cable kickbacks primarily in the lumbar spine rather than the glute. The peak of the movement should be where the hip is fully extended, not where the lower back begins to hyperextend. Stop at the point of maximum glute contraction, which is not necessarily as high as the leg can physically go.
A straight leg throughout
As discussed, a straight leg increases hamstring involvement and reduces glute isolation. This is not a hamstring exercise.
Going too heavy
The cable kickback is not a heavy-loading exercise. The glute can be meaningfully stimulated with relatively light weight if the technique is correct. Heavy weight almost always produces momentum, a straight leg, and lower back compensation. Start lighter than you think you need to.
Neglecting the eccentric
The lowering phase is where a significant portion of the muscle-building stimulus occurs. A 2 to 3 second controlled return is not optional, it is half the exercise.
Bottom Line
The cable kickback is an isolation exercise, and that determines exactly where it belongs in a session: after the compound work, not instead of it.
Squats, hip thrusts, Romanian deadlifts and lunges produce greater overall glute growth due to the heavier loading they allow and the longer muscle length many of them train through. The kickback’s role is to add targeted isolation volume on top of that foundation, to improve the mind-muscle connection with the glute, and to address any imbalance between sides.
A well-structured glute session might look like: hip thrusts or Romanian deadlifts as the primary compound, a lunge or split squat variation as a secondary compound, and cable kickbacks as a finishing isolation movement for 3 to 4 sets per side at moderate weight with strict form.
Used that way, the cable kickback does exactly what an isolation exercise should do. It does not replace the compound work. It completes it.
Related Articles: