The bench press needs no introduction. It is one of the most popular exercises in any gym, the cornerstone of countless upper body programmes, and a genuine test of pressing strength.
But even the best exercises have their limitations. If the bench press is the only pressing movement in your routine, you are almost certainly leaving progress on the table.
The Larsen press is one of the most effective variations available, and one that has quietly made its way from powerlifting platforms into mainstream gym training. It looks almost identical to a standard bench press, but one small change alters the entire nature of the movement, increasing the demand on the chest, shoulders and triceps in a way that regular benching simply cannot replicate.
This guide covers everything you need to know, including how to perform the Larsen press, the muscles worked, the key benefits, how it compares to a standard bench press, and what to consider before adding it to your programme.

Quick Summary
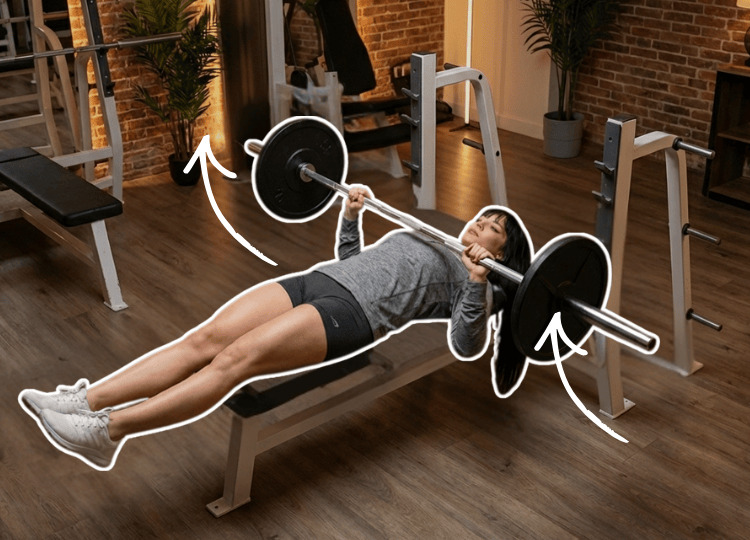
- The Larsen press is a bench press variation where the feet are lifted and extended off the floor, removing leg drive entirely from the movement.
- It places greater demand on the chest, triceps and shoulders than a standard bench press, and increases core engagement as a meaningful secondary benefit.
- Most lifters will press around 8% less than their standard bench press max, which reflects the removal of leg drive rather than any reduction in upper body effort.
- It works best as an accessory movement during higher volume training phases, sitting alongside rather than replacing your main bench press work.
What is the Larsen Press?
The Larsen press is a bench press variation where the feet are lifted off the floor and held straight out during the press, rather than planted on the ground as they would be in a standard bench press.
That’s the only mechanical difference… but the impact on how the exercise feels, and what it demands from the body, is significant.
The exercise was originally popularised by Adrian Larsen, a bench press specialist in competitive powerlifting who was born with dislocated hips and club feet and underwent multiple corrective surgeries as a child. Having grown up wearing leg braces, Larsen developed a pressing style that relied less on leg drive than most powerlifters – and the variation named after him reflects that approach directly.
By lifting the feet, leg drive is completely removed from the movement. In a standard bench press, leg drive contributes meaningfully to how much weight can be moved. Strip that away and the chest, triceps and shoulders have to do all the work, which is both the challenge and the point of the exercise.
Larsen Vs Feet Up Bench Press
It is worth noting that the Larsen press is a distinct movement from the feet-up bench press, where the feet rest on the bench rather than hovering above the floor. The Larsen press creates more instability than the feet-up variation and also increases core stability and oblique tension under the bar, making it the more demanding of the two.
How to Perform the Larsen Press
To do the Larsen press:
- Set up on a flat bench as you would for a standard bench press. Position yourself so your eyes are roughly in line with the barbell, and retract your shoulder blades to create upper back tightness.
- Grip the bar slightly wider than shoulder width, using a full grip with the thumb wrapped around the bar for safety.
- Brace your core and unrack the bar with your feet still on the floor. Getting a safe un-rack is easier with the feet planted, so establish your position fully before lifting the legs.
- Once the bar is stable over your chest, lift your feet from the floor and extend your legs straight out, hovering them above the ground. Engage your quads and squeeze your core to create full-body tension.
- Lower the bar in a controlled manner to your chest, keeping your elbows at roughly a 45 to 75 degree angle from your torso depending on your natural pressing mechanics. Do not bounce the bar off your chest.
- Press the bar back up to the starting position, driving through your chest and triceps. Keep your feet elevated and your core braced throughout.
- Complete all reps before lowering your feet back to the floor, then re-rack the bar safely.
Coach’s Tip: The most common mistake is allowing the core to collapse as fatigue sets in, which causes the lower back to arch excessively and the legs to drop. Think of the legs as an active part of the exercise rather than just a passenger… squeezing the quads and keeping them extended throughout each set maintains the tension that makes the movement effective.
Muscles Worked
- Pectoralis Major – the primary target, worked more intensively than in a standard bench press as every rep is driven entirely by the upper body with no assistance from leg drive. Research supports that benching with feet off the ground increases pec activation compared to the standard variation.
- Triceps – heavily involved throughout the press, responsible for elbow extension on the way up and working harder than usual to keep the bar path consistent given the instability created by the lifted legs.
- Anterior Deltoids – assist the pecs through the press, particularly in the initial phase as the bar leaves the chest, with demand slightly higher than standard bench pressing due to the removal of the leg-driven arch.
- Core and Obliques – work continuously to keep the body stable throughout every rep, replacing the grounded base that the feet would normally provide. This is one of the most distinctive secondary benefits of the exercise.
- Back Extensors – hold an isometric contraction to maintain the elevated rib cage position throughout, working harder than in a standard bench press since leg drive is no longer available to assist with achieving that position.
Best chest exercises
Looking to upgrade your chest workout? Check out our guide on the best exercises for a tighter chest.
Larsen Press vs Bench Press
Beyond the obvious difference in foot position, the two exercises diverge in several meaningful ways that are worth understanding before you programme the Larsen press into your training.
The most immediate practical difference is load. On average the Larsen press self-limits by around 8% compared to a competition bench press, meaning a lifter with a 300lb bench press would typically press around 275lb in the Larsen variation.
This isn’t a weakness of the exercise – it’s a feature. The reduction in load comes entirely from the removal of leg drive, not from any reduction in upper body demand. In fact the upper body is working harder, just without the assistance.
The range of motion also changes. High arch bench pressers naturally have a shorter range of motion due to the position their arch creates. Lifting the feet reduces the arch considerably, which means the bar has further to travel and the pecs are loaded through a greater range – a meaningful benefit for muscle development.
In terms of where each exercise belongs in a programme, the bench press remains the primary strength movement for most lifters. The Larsen press works best as an accessory movement, particularly during higher volume training phases where the goal is hypertrophy rather than maximal strength.
It increases the relative intensity on the pecs, triceps, and shoulders without physically loading more weight on the bar – which makes it a smart option for accumulating upper body volume without creating excessive fatigue.
For powerlifters specifically, the Larsen press is well-suited to the off season when competition specificity is less important and building muscle is the priority.
More strength training ideas for the chest
Check out our guide on 6 incline bench press alternatives that work the upper chest.
Strength Standards
There are no published strength standards specific to the Larsen press. The most reliable way to set expectations is to take your current bench press one rep max and reduce it by approximately 8%, which is the average self-limiting effect of removing leg drive from the movement for most lifters. Use this as your starting reference point when loading the exercise for the first time.
As a general guide based on bench press standards adjusted for the Larsen press reduction:
For men, a beginner lifter would typically expect to Larsen press in the region of 65 to 85kg. An intermediate lifter would expect somewhere around 85 to 115kg. An advanced lifter would be working comfortably above 115kg.
For women, a beginner would typically expect to Larsen press in the region of 25 to 40kg. An intermediate lifter would be in the range of 40 to 65kg. An advanced lifter would be working above 65kg.
These figures assume standard barbell weight and will vary based on bodyweight, training history, and individual mechanics. They are intended as a rough orientation rather than a precise benchmark. If you want a more specific reference point, take your current bench press max, reduce it by 8%, and use that as your starting guide.
Things to Consider
Barbell vs Dumbbells
The barbell is the most common implement for Larsen pressing and the most practical option for progressive overload over time. It’s also the version most directly transferable to the competition bench press for powerlifters.
The dumbbell Larsen press is a useful variation that introduces an additional stability challenge, since each arm must control its own load independently. This increases the demand on the stabilising muscles of the shoulder and core, and makes it a good option for those wanting to address imbalances between sides. The trade-off is that you’ll typically use less load than with a barbell, and the instability of the dumbbell variation makes it less suitable for heavier work.
If you’re new to the Larsen press, starting with dumbbells can actually be a sensible way to learn the mechanics before progressing to a barbell – the lighter loads and independent arm movement make it easier to feel what the exercise demands without the added complexity of a fixed bar.
Always Use a Spotter or Safety Setup
The instability created by lifting the feet makes the Larsen press more demanding to control than a standard bench press, particularly as fatigue sets in during later sets. Always use a spotter or ensure the power rack safeties are set at an appropriate height before attempting the exercise. This is especially important at heavier loads where a failed rep without a safety net carries real injury risk.
Grip Width
The standard competition grip works well for most lifters and is the natural starting point. A closer grip shifts more emphasis onto the triceps, which can be useful if tricep strength is a limiting factor in your bench press. A wider grip places more demand on the chest and shoulders. Experiment with grip width once you’re comfortable with the basic movement pattern, but avoid going too wide as this increases shoulder stress.
Not Ideal for Beginners
The Larsen press creates more instability than the feet-up bench press variation and can be unsafe for beginner lifters before they have built the proper technique, strength, and body awareness for the movement. If you’re relatively new to bench pressing, build a solid foundation with standard bench pressing first. The Larsen press is best introduced once you have good control of your bar path and a reliable bench press technique to fall back on.
Lower Back Comfort
Some lifters find that hovering the legs completely causes the lower back to arch more than is comfortable, particularly those with anterior pelvic tilt. If this is the case, resting the feet on a low block or step rather than leaving them completely unsupported is a straightforward solution. It reduces the instability slightly but keeps the key benefit of the exercise – the removal of leg drive – fully intact.
Bottom Line
The Larsen press is a genuinely effective bench press variation that earns its place in upper body training for both powerlifters and general gym-goers.
By removing leg drive, it places more demand on the chest, triceps and shoulders than standard bench pressing, increases core and oblique engagement, and forces a greater range of motion through the pecs – all without adding more weight to the bar.
It works best as an accessory movement during higher volume training phases, sitting alongside rather than replacing your main bench press work.
Related Articles