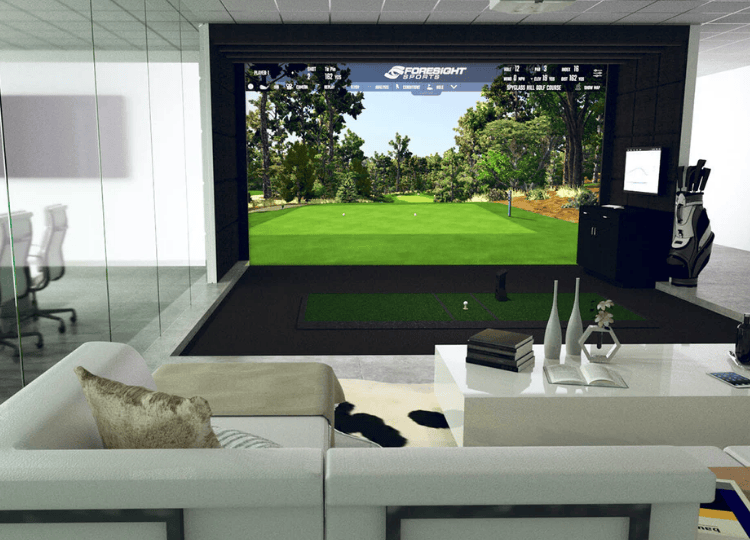
A golf simulator room allows players to practice, analyze performance, and enjoy virtual courses in a controlled indoor environment. While launch monitors and impact screens often receive significant attention, the projector plays an equally important role. Image clarity, brightness, and proper placement directly influence the realism and functionality of the simulator experience.
Selecting the right projector requires careful consideration of room dimensions, lighting conditions, screen size, and system compatibility. An informed decision ensures that the projected image aligns correctly with the impact screen and provides accurate visual feedback during practice sessions. The following guide explains the key factors to evaluate when choosing a projector for a golf simulator room.
Understand Room Size, Throw Distance, and Screen Dimensions
Before evaluating projector specifications, it is essential to measure the simulator room carefully. Ceiling height, room depth, and screen width determine what type of projector and lens configuration will work effectively.
In many home golf simulator setups, space limitations make throw distance particularly important. Throw distance refers to how far the projector must be positioned from the screen to create a full-size image. A short-throw or ultra-short-throw projector is often preferred in compact rooms because it can produce a large image from a shorter mounting distance. This reduces the risk of shadows when a player swings and minimizes the chance of the projector being struck by a golf ball.
To calculate appropriate placement, consider:
- The width and height of the impact screen
- The projector’s throw ratio (distance divided by image width)
- The mounting position, typically ceiling-mounted behind the hitting area
Ensuring that the projector’s specifications match the room dimensions prevents distortion and helps maintain proper image alignment.
Evaluate Brightness and Ambient Light Conditions
Brightness is measured in lumens and plays a central role in image visibility. A simulator room with controlled lighting requires fewer lumens than a space with natural light or overhead fixtures.
For most indoor golf simulator rooms, a projector with at least 3,000 lumens is generally suitable. If the room cannot be fully darkened, higher brightness levels may be necessary to maintain image clarity. Insufficient brightness can result in washed-out visuals, making it difficult to track ball flight and read on-screen data.
It is also helpful to consider:
- Wall color, as lighter walls may reflect light
- Whether blackout curtains are installed
- The level of glare from other light sources
Balancing projector brightness with room lighting conditions enhances realism and reduces eye strain during extended practice sessions.
Consider Resolution and Image Quality
Resolution determines the sharpness and detail of the projected image. Higher resolution provides clearer graphics, more readable data, and a more immersive simulation environment.
Common projector resolutions include:
- Full HD (1920 x 1080)
- WUXGA (1920 x 1200)
- 4K Ultra HD
For most golf simulation systems, Full HD resolution offers sufficient clarity. However, players seeking enhanced visual detail may prefer higher resolutions, particularly when using advanced golf simulation systems that display detailed course environments and performance metrics.
Image quality also depends on contrast ratio, which affects the difference between light and dark areas of the image. Higher contrast ratios typically improve depth and clarity, especially when displaying course landscapes and ball flight paths.
Match Aspect Ratio to the Impact Screen
The projector’s aspect ratio must align with the shape of the impact screen. Most golf simulator screens use either a 16:9 or 16:10 aspect ratio.
A mismatch between projector aspect ratio and screen dimensions can lead to:
- Black bars at the top or sides
- Image stretching
- Cropping of important visual data
When designing a golf simulator room, it is helpful to confirm the screen’s dimensions before selecting the projector. Matching the aspect ratio ensures that the image fills the screen without distortion.
For example, if the impact screen has a 16:9 ratio, a projector designed for 16:9 output will provide optimal alignment. Consistency between screen and projector specifications contributes to a professional and balanced visual presentation.
Assess Installation and Mounting Options
Projector placement affects both safety and performance. In most indoor golf practice setups, ceiling mounting is preferred. Mounting the projector above and slightly behind the hitting area reduces the risk of accidental contact and minimizes shadows.
Important installation considerations include:
- Ceiling height and mounting brackets
- Cable routing and power access
- Alignment adjustments for keystone correction
- Ventilation and airflow around the projector
Keystone correction and lens shift features allow minor image adjustments without physically moving the projector. However, excessive digital correction may reduce image quality. Ideally, the projector should be positioned accurately from the start to limit reliance on digital adjustments.
Proper mounting ensures long-term stability and consistent image alignment during repeated use.
Ensure Compatibility With Simulator Software and Hardware
The projector must integrate smoothly with the chosen golf simulation system. Compatibility includes resolution support, input connections, and refresh rate requirements.
Check that the projector includes:
- HDMI inputs for simulator computers or gaming systems
- Support for the resolution output by the simulator software
- Adequate refresh rate to prevent motion lag
A mismatch between projector capabilities and simulator output may lead to reduced image quality or performance issues. Reviewing technical specifications in advance prevents integration challenges.
In advanced golf simulator configurations, some users connect multiple displays for data tracking and performance analysis. In such cases, confirm that the computer system can support the projector alongside other display devices.
Consider Durability and Maintenance Requirements
Golf simulator rooms involve repeated ball impact against the screen. Although the projector is typically mounted safely out of range, durability remains an important factor.
Laser projectors often require less maintenance than lamp-based models because they have longer light source lifespans and do not require periodic lamp replacement. However, both types can function effectively when installed correctly.
Other maintenance considerations include:
- Dust filter cleaning
- Airflow management
- Manufacturer-recommended servicing intervals
Selecting a projector with reliable build quality and accessible maintenance features supports consistent performance over time.
Conclusion
Choosing the right projector for a golf simulator room requires thoughtful evaluation of room dimensions, throw distance, brightness, resolution, and compatibility. Proper measurement of the space ensures that the projector can produce a full-screen image without distortion or shadow interference. Adequate brightness and matching aspect ratios enhance visibility and realism, while appropriate resolution supports clear course visuals and performance data.
Installation considerations, including ceiling mounting and alignment features, contribute to safety and image stability. Compatibility with simulator software and hardware ensures smooth operation, and understanding maintenance requirements supports long-term reliability.
By carefully assessing these factors, individuals designing golf simulator rooms can select a projector that delivers consistent image quality and supports an effective indoor golf practice experience.